
Introducing PsychoPy and its basic elements
7 August 2026
PsychoPy (Peirce, 2007, 2008; Peirce et al., 2019) is a free software developed for designing, implementing and running Psychology and Cognitive Neuroscience experiments in Python (a programming language popular, among other fields, in scientific applications). Compatible with all major operating systems (Windows, Linux, and macOS), PsychoPy offers a temporal precision that matches or surpasses that of several commercial alternatives (Bridges et al., 2020).
One of the main features that sets PsychoPy apart from some of its equivalents is its flexibility, as it is possible to prepare a simple experimental task using the Builder window – an intuitive and easy-to-use graphical interface – or to program, from scratch, in Python, in the Coder window, a task as complex as necessary. It is also possible to combine the advantages of both, as one might insert lines of Python code from within the Builder window. Finally, PsychoPy has a third window, called Runner, from which an already-programmed experimental task can be launched, as well as alerts and error messages consulted whenever, for some reason, the experiment fails to run successfully.
The rest of this document briefly presents the structure of the PsychoPy Builder window, followed by a brief clarification of the spatial units used in this software, and a short list of some of the main components available for implementing an experiment in Cognitive Psychology.
The Builder window
The PsychoPy Builder window is divided into four main areas (see Figure 1). At the top (shown in blue in Figure 1) is the main menu, where you can use the mouse pointer to access file options (open, create new, save, etc.), general settings for the open experimental task (screen settings, input devices, data collected) and options for testing/running it, as well as options and settings for running the experiment online (via the Pavlovia platform).
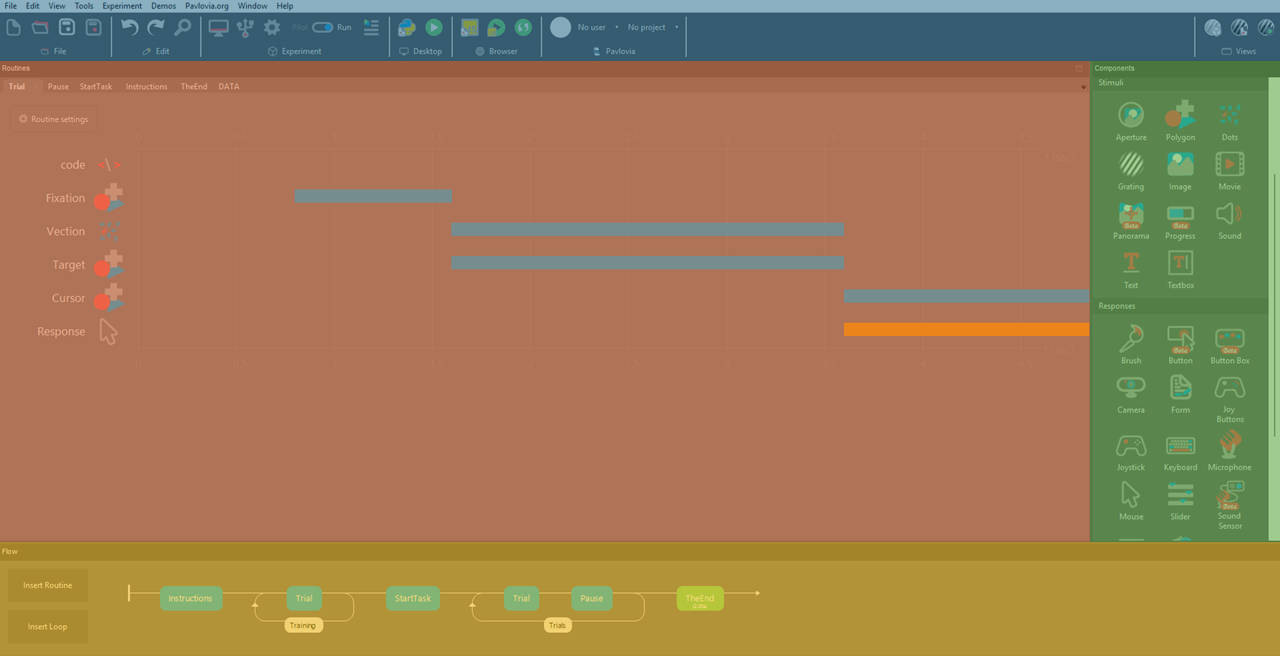
At the bottom of the window (shown in yellow in Figure 1) is the flowchart (flow), which displays a timeline listing, from left to right, the order of the different routines (different boxes) as well as any loops that exist. This is also the area where new routines and loops can be added to the experiment.
In the centre, taking up most of the Builder window (shown in orange in Figure 1), is the routine area – here, the different components included in the selected routine are listed (any routine listed in the flowchart can be selected by left-clicking the corresponding box), including a visual representation of their start and end points.
Finally, on the right-hand side (shown in green in Figure 1) is the components menu, which lists the different components that can be added to the selected routine. The components menu is organised into several subsections, the most relevant of which are dedicated to stimuli (events perceptible to the participant, such as visual or auditory elements) and responses (peripherals through which participants can provide a response).
Any event to be included in an experimental task (e.g., showing an image to the participant or recording a key press by them) is introduced and defined via the components menu. Once a component has been selected, and once some parameters and settings have been defined, it appears listed in the routine area. The different components included in a routine are listed vertically, and their start and end points (relative to the start of the routine and on the timeline at the top of this area) are represented visually along the horizontal axis, in the form of more or less extended bars. Routines thus constitute structured sequences of events and, in their most basic form, are used to present a stimulus to the participant and record their response to it. New routines, as well as loops that determine the repetition of one or more routines, can be inserted into the flowchart, which provides a visual representation of the sequential structure (in terms of routines and loops) of the entire experimental task, from left to right (the far left represents the start of the experimental task when run, and the far right, marked with an arrow, its end; routines are represented by boxes and loops by lines/arrows encompassing one or more routines).
As these constitute the basic ingredients for designing and implementing an experimental task in PsychoPy, the rest of this text presents a brief overview of some of the main components available in this software, preceded by a few notes on spatial units.
Spatial units in PsychoPy
A particularly relevant aspect for configuring several components available in PsychoPy, especially visual stimuli, concerns the definition of the on-screen coordinates where they are shown, as well as the spatial extent they occupy.
PsychoPy incorporates a range of spatial units for this purpose, including pixels and, provided the physical size of the screen and its distance from the observer are specified, centimetres and degrees of visual angle. For any spatial unit chosen for an experimental task or for a particular component, the origin (that is, the coordinates [0, 0]) is given by the centre of the screen. In any case, the default spatial unit option, and undoubtedly the most suitable for implementing most experimental tasks, is given in height units. These are units normalised to the height of the screen attached to the computer on which the experimental task is run, which makes it possible for the same relative arrangement of visual elements to be preserved regardless of the physical dimensions of the screen or its resolution in pixels, even if the task was prepared on a different computer.
In height units, the height of the screen corresponds to a value of 1. That is, if a stimulus (e.g., an image) is defined as having a horizontal extent of 1, its width will equal the height of the screen. If the size of a stimulus (where w refers to its horizontal extent – width – and h to its vertical extent – height) is defined as
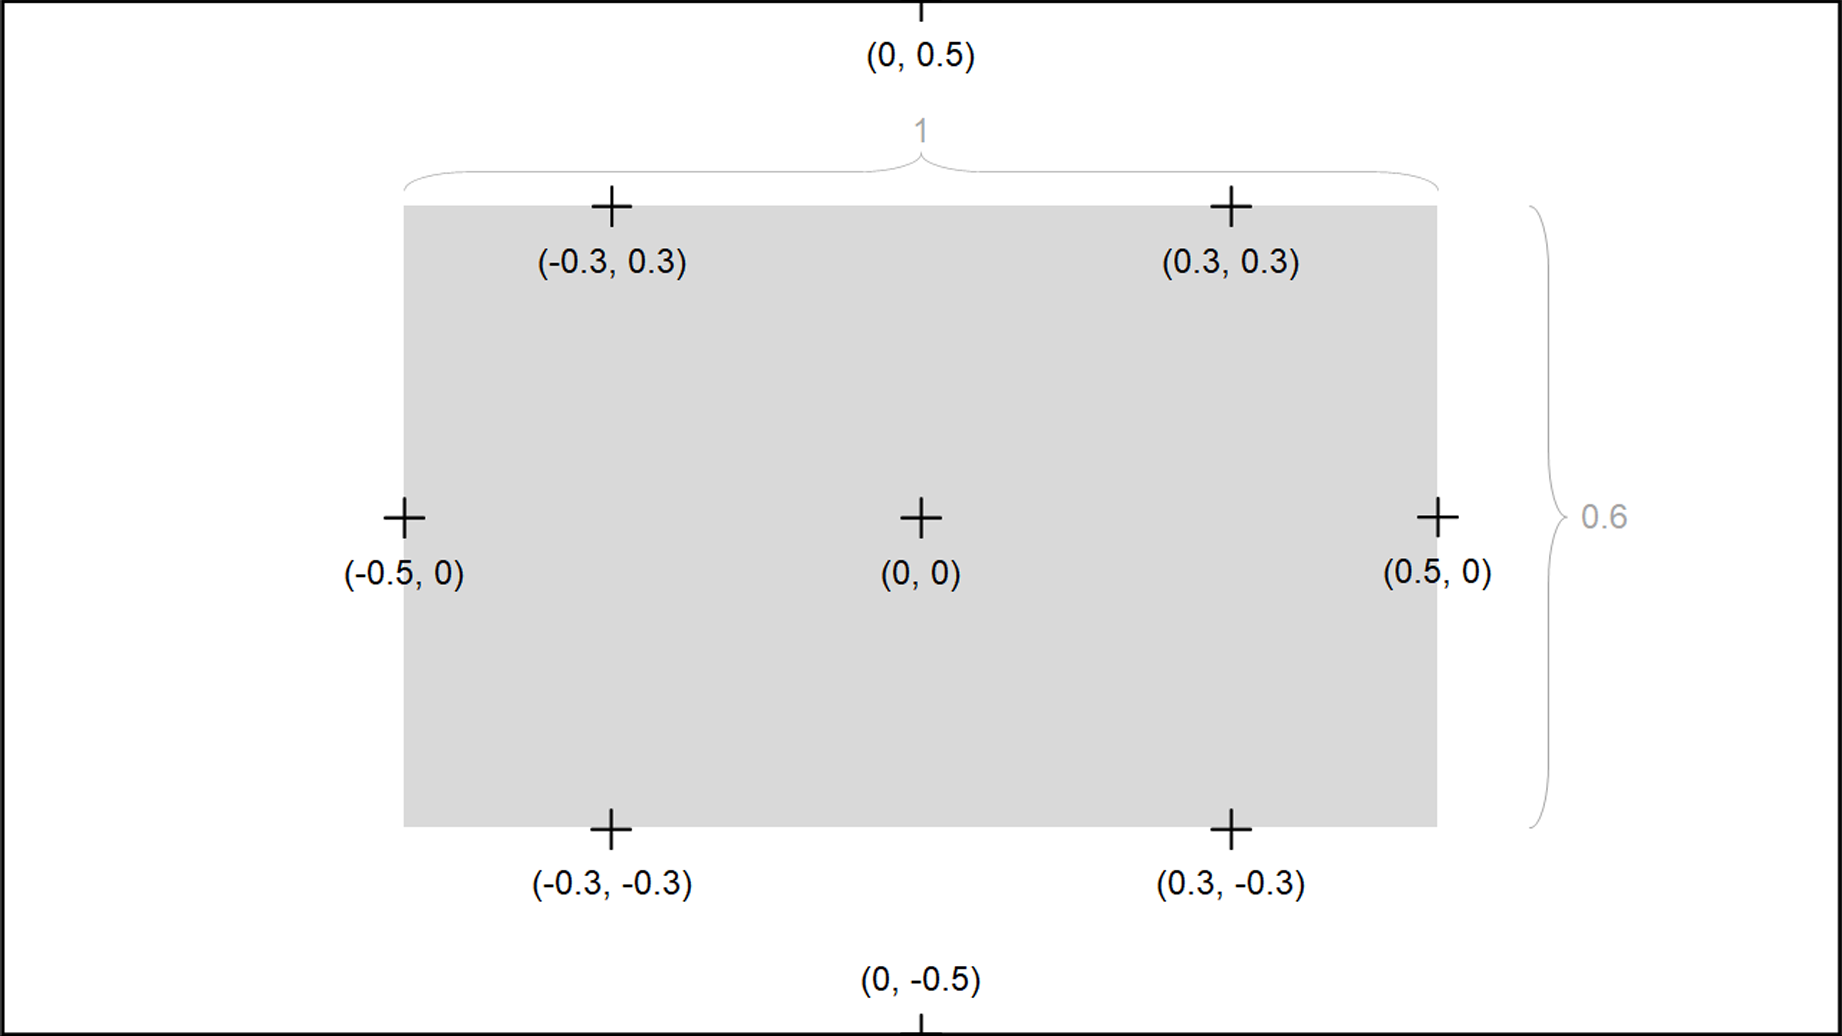
On-screen spatial coordinates work in a similar way (see Figure 2). Relative to the centre of the screen (the origin), with coordinates (0, 0), any stimulus positioned to the right/left or above/below this point will have positive/negative horizontal/vertical coordinates, respectively. The values entered for the coordinates are likewise normalised relative to the height of the screen. Thus, for example, the point (0.5, 0) is centred vertically and offset to the right by half the height of the screen. A stimulus placed at coordinates (0.25, -0.4) is located to the right of the centre of the screen by 25% of the screen's height and below the centre by 40% of the screen's height. Finally, a stimulus placed at coordinates (-0.5, 0.1) is located to the left of the centre of the screen by half the height of the screen and above that point by 10% of the height of the screen. Figure 2 uses crosses to represent various locations, together with their coordinates in height units, in a schematic representation of a screen. The grey rectangle represents a possible stimulus, with its vertical and horizontal extent indicated by the grey values. Knowing the resolution of the screen being used, it is straightforward to determine the extent and/or coordinates of any stimulus in pixels. For example, on a screen with a resolution of 1920 × 1080 pixels, a stimulus with a width, in height units, of 0.75 will occupy an extent of 0.75 × 1080 = 810 pixels. If the same stimulus is shown on a screen with a resolution of 1024 × 768 pixels, its width will be 0.75 × 768 = 576 pixels. Obviously, if the two screens, despite their different resolutions, have the same physical size, the stimulus will also retain the same physical size (namely, 0.75 of the height of the screen). This would clearly not be the case if the size of the stimulus were defined in pixels, as that value would have to be adjusted for each screen.
Stimulus components

Text. As the name suggests, this component allows sequences of text to be presented. It is possible to set the colour and font, its opacity and size on screen, as well as to present the text flipped (horizontally or vertically) and/or rotated. When the text to be presented is relatively long, it is also possible to set a maximum line length.

Polygon. This component displays a geometric shape on screen, including lines, triangles, rectangles/squares, circles, crosses, stars and arrows. It is also possible to define regular polygons with n sides. For any geometric shape, you can set its size, fill colour, border colour and width, opacity and orientation.

Image. The image component displays an image on screen, accepting almost any file type (e.g., .tif, .jpg, .bmp, .png, etc.). In addition to its size on screen, it is possible to set the image's colour space (e.g., RGB, HSV, etc.), as well as its colouring and contrast. It is also possible to flip the image, vertically or horizontally, or change its orientation. Finally, a mask can be defined through which the image is presented, either by specifying a mask image, using one of the predefined masks (circle, gauss, raisedCos), or by specifying a custom spatial filter as a matrix (with values between -1 and 1).

Movie/Animation. This component allows video files to be presented (e.g., .mpeg, .avi, .mov). Its size on screen and duration can be set, and it is possible to specify whether the routine should end when the video finishes. The video can also be looped (until some other instruction, triggered by another component, determines its end), and the sound can be adjusted or removed. Finally, the video's opacity, contrast and on-screen orientation can be varied.

Sound. This component, the only non-visual stimulus in PsychoPy, plays a sound through the computer's speakers for a specified duration. You can use a sound file (compatible file types include .mid, .wav, .ogg; it is important to note that the .mp3 format is not supported) or define a specific note, using the standard notation: C, D, E, F, G, A, B. These can also be combined with the terms 'sh' and 'f' for sharps and flats, respectively (for example, Gsh plays a G#). Finally, the volume can be adjusted on a normalised scale between 0 (minimum) and 1 (maximum).
Response components

Keyboard. This component monitors the keyboard and records the pressing of any key defined as a possible response. In addition to the moment from which, and until which, a key can be pressed, this component allows you to define whether data is recorded for the moment the specified key(s) is/are pressed or released, and whether a response should or should not interrupt the routine. Being a response component, it is also possible to specify which data are saved – the first key pressed, the last key pressed, all keys pressed (if a response interrupts the routine, these last options will likely be unnecessary) or whether no data should be recorded at all (useful when you want the participant to interact with a part of the experiment that is not intended for data collection, such as to end an instructions routine). Finally, it is possible to define which responses should be classified as correct responses. As with all other components, this one must also have a unique name, that is, a name not used to label any other component or variable. Assuming the chosen name is Response, the component records the following values in the data file (in separate columns) for each trial repetition: Response.keys – which key(s) was/were pressed; Response.rt – the moment, in seconds, at which the key was pressed, measured from the start of the component (e.g., if the component starts 2 seconds after the start of the routine and the key is pressed 0.25 seconds after the component starts, the value recorded is 0.25, not 2.25); Response.corr – if a response has been defined as correct, this takes a value of 1 for that response and a value of 0 for any other (note that this option can be useful even in cases where, technically, there is no single correct response – for example, in a temporal bisection task, where the interest lies in recording the frequency of 'long' responses for a given stimulus of variable duration, if the 'long' response is defined as the "correct" one, the average values recorded in Response.corr for each duration will directly reflect the frequency of 'long' responses).

Mouse. This component allows participants to provide responses using a mouse, trackball, touchpad, or equivalent devices. Again, a unique name must be defined for it, along with a start time (relative to the routine) and duration during which the mouse is monitored. Similarly to the keyboard component, the mouse component also allows you to choose whether a response (i.e., pressing one of the mouse buttons) ends the routine or not, though with more options: you can set (i) that the routine does not end with a mouse response, (ii) that it ends with any mouse response, (iii) that the routine ends with a valid response (if clickable stimuli have been defined; see below), or (iv) that the routine ends with a correct response (if clickable stimuli have been defined, one of which is classified as correct; see below). You can specify which visual stimuli (provided they are on screen during the same period in which the mouse is monitored) are clickable, that is, whether pressing a mouse button should only be considered valid if the cursor is positioned over that stimulus/those stimuli. To do this, the names of these components are listed in the Clickable stimuli field. Regarding the data recorded, you can choose none, only the state of the mouse at the end of the routine, only when one of the buttons is pressed, only when one of the buttons is pressed over a valid (clickable) stimulus, or at every screen refresh (i.e., every frame; useful when you want to record the trajectory of the mouse's movement over time). If data recording is chosen for this component, the following values will be saved for each trial repetition, assuming the component was named Response: Response.x – the horizontal on-screen coordinates of the mouse cursor, in the specified units (height units by default; see above); Response.y – the vertical on-screen coordinates of the mouse cursor, in the specified units; Response.leftButton, Response.midButton and Response.rightButton – whether the left, middle or right mouse button was pressed, respectively (1 for pressed and 0 for not pressed); Response.time – the moment, in seconds and relative to the start of the mouse component, at which a button was pressed; Response.clicked_name – if clickable stimulus/stimuli have been defined, this specifies the name of the stimulus over which the button was pressed.
Python code component

Code. This component allows lines of Python code to be added (PsychoPy also automatically translates these lines of code into JavaScript, allowing the experiment to be run online), and it is possible to specify whether they should be read before the experiment, at the start of the experiment, at the start of the routine in which the code component was inserted, at every screen refresh (frame) of that routine, at the end of the routine, or at the end of the experiment. Although the basic components available in the components menu already allow the implementation of countless experimental tasks, it is thanks to this component that PsychoPy is so flexible and allows the programming of virtually any task (or, if desired, program or application) one might wish. Even relatively modest use of this component allows small but important adjustments to be made to how a given experiment is run, beyond what is offered by PsychoPy's basic components.
Bibliography
-
Bridges, D., Pitiot, A., MacAskill, M. R., & Peirce, J. W. (2020). The timing mega-study: Comparing a range of experiment generators, both lab-based and online. PeerJ, 8, e9414.
-
Peirce, J. W. (2007). PsychoPy—Psychophysics software in Python. Journal of Neuroscience Methods, 162(1–2), 8–13.
-
Peirce, J. W. (2008). Generating stimuli for neuroscience using PsychoPy. Frontiers in Neuroinformatics, 2.
-
Peirce, J. W., Gray, J. R., Simpson, S., MacAskill, M., Höchenberger, R., Sogo, H., Kastman, E., & Lindeløv, J. K. (2019). PsychoPy2: Experiments in behavior made easy. Behavior Research Methods, 51(1), 195–203.